Online Selection & Acquisitions
Electronic Data Interchange (EDI) is an electronic method of transferring formatted data between businesses. EDI allows OSA to transmit your orders to the designated vendor. Each vendor's configuration must be set up to include "vendor specific" information that allows for the transfer of the order information to the vendor.
Important: If you will be using the X12 option, before you begin be sure you have gathered all the required settings information you need.
About the Paper and Email Options
Include Distribution Info on PO? - If you want to have distribution information included in the order, select the check box Include Distribution Info on PO?. Distribution Information includes Quantity, Fund, Library, Cost per Unit, and Extension.
Order PO by - Select the appropriate option (Item Number or Title) to print the orders in Order Number or Title sequence.
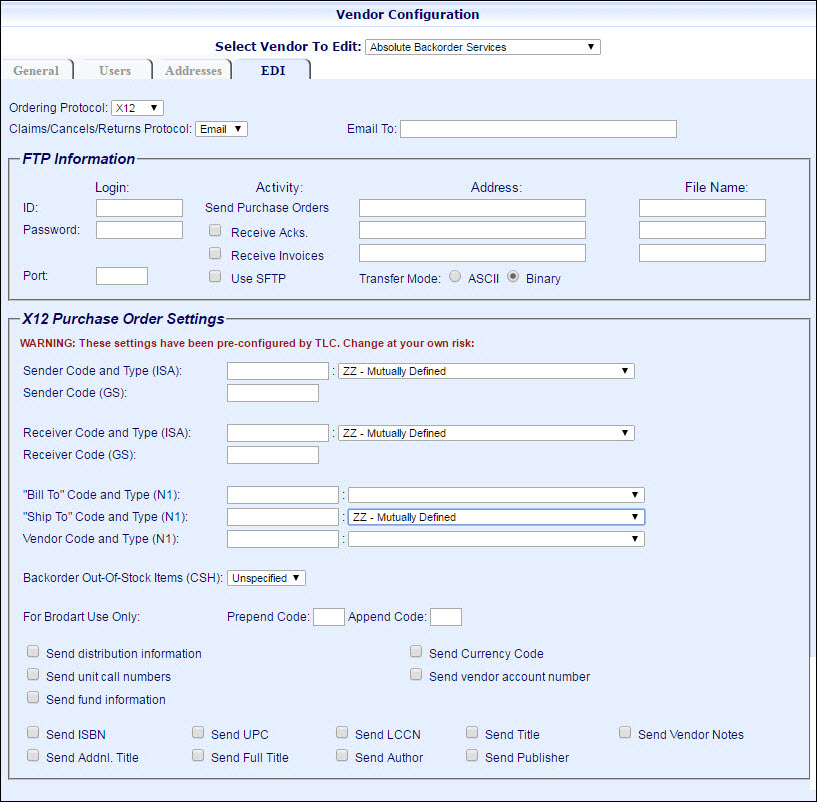
There are three options available via the EDI Control Ordering Protocol drop-down list, as shown below.
Ordering Protocols
Email - If you select this Ordering Protocol, type the name of who will receive the purchase orders in the Email Purchase Orders To box. Under the Claims / Cancel / Returns Protocol area, if you select Email, then type the appropriate email address in the Email To box.

Paper - If you select this Ordering Protocol, no EDI transaction occurs. The order will be sent to the printer configured on your system, and then must be manually mailed or faxed to the vendor. If the Claims/Cancel/Returns Protocol Email option is selected, type the appropriate email address in the Email To: box. If Paper is selected, Email To: box does not display.

X12 - This is a protocol developed by the American National Standards Institute (ANSI), for use with electronic ordering.
EDI Control: If Email is selected under the Claims/Cancel/Returns Protocol Email option, type the appropriate email address in the Email To box. If Paper is selected, Email To: box does not display.
FTP
/ X12: The X12
option requires you to enter specific FTP
(File Transfer Protocol) and X12
Purchase Order Settings information.
For FTP Information complete the information. The Port default is 21, but is based on what your vendor provides. Edit the Port when necessary. Select the Use SFTP check box if your vendor supports the SFTP protocol. When you select this check box, the Transfer Mode and choices (ASCII or Binary) are removed.
Note: The ID, Password, and Port fields are mandatory.
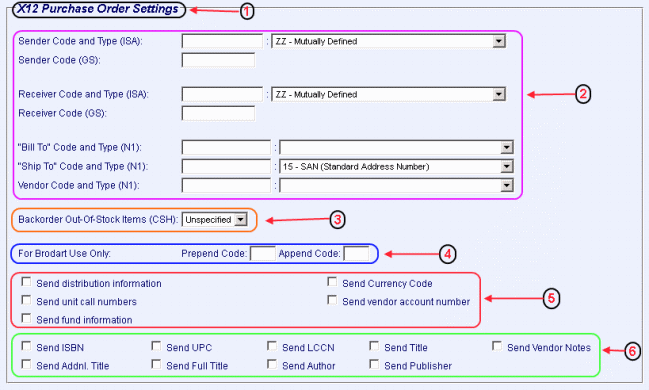
For X12 Purchase Order Settings the default Type drop-down selections should be retained unless the vendor advises to use another option. See the X12 Purchase Order Settings table below for details about required X12 fields and more.
Note: The vendor being configured should provide the information required to complete these fields.

X12 Purchase Order Settings Information
Current Layout |
 |
X12 Legend
Note: The vendor being configured should provide the information required to complete the X12 Purchase Order Settings fields.
|
Current Setting Name |
Comments |
1 |
X12 Purchase Order Settings |
|
2 |
Sender Code and Type (ISA) * |
Required |
Sender Code (GS) * |
Required |
|
Receiver Code and Type (ISA) * |
Required |
|
Receiver Code (GS) * |
Required |
|
"Bill To" Code and Type (N1) ** |
This option allows the vendor to use a "Bill To" an address that is different than the "Ship To" address. |
|
"Ship To" Code and Type (N1) |
|
|
Vendor Code and Type (N1) |
||
3 |
Backorder Out-Of-Stock Items (CSH) ** |
The default setting is Unspecified in all cases. This drop-down option allows you to indicate whether or not the vendor should automatically process order items that are currently out of stock. The drop-down options are Yes, No, and Unspecified. Select Yes to have items that are out of stock automatically ordered. Select No to NOT have out-of-stock items automatically ordered. If the Unspecified option is used the decision to order out-of-stock items is up to the individual vendor's policy. |
4 |
For Brodart Use Only: Prepend Code / Append Code |
These fields apply only when configuring the X12 Purchase Order Settings for Brodart. These settings should not be used when configuring other vendors. |
5 |
Select the checkbox(es) for the information you want returned. |
|
6 |
Select at least one.
|
Required: At least one (1) of these options must be selected. Send Vendor Notes: For details, see: Add a Note to An Item. |
When you are finished click the Save Vendor button, or return to Add, Update, Copy Vendors to continue making changes to this vendor.