Online Selection & Acquisitions
Clicking the My Lists link on the Navigation Toolbar opens the Lists created by <logged on User Name> page displaying any pending lists the logged on user has created.
![]()
For new users, by default an empty list is created and titled <User name> List <List ID>.

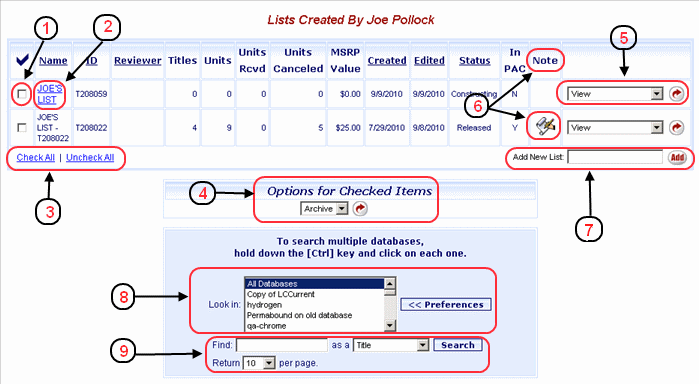
The numbered list below corresponds to the numbered items on the example above.
Features of the Lists Created by <user name> page
Check box for Options for Checked Items: Selecting this check box makes the entry eligible for the displayed action on the Options for Checked Items drop-down list.
View List: On any list of lists, the list Name displays as an underlined link. Clicking the underlined list Name opens the list. This is equivalent to the View drop-down option.
Check All / Uncheck All - Click these links to select all lists displayed, or clear the selection of all checked lists.
Options for Checked Items: This drop-down list displays a variety of options depending on the status of the list and other circumstances. Selecting an entry from the drop-down list and then clicking the rotating red arrow button will invoke the selected action against the checked items on the displayed list of lists. This option is also available on the List Details page to take action against items on a list. See the Options for Checked Items Overview Help topic for detailed information.
List Management: This is the list management drop-down list. By default View is the displayed option. To view the list click the rotating red arrow button, or select another option from the drop-down list and click the arrow button to take the selected action. The options displayed on this list depend on the status of the list and other circumstances.
The options for a new list with a status of Constructing are:
with no items assigned to the list: View, Rename, Add Note, Make Private, Make Default, Sharing, and Delete. Other than View, these options are also available on the List Management Options drop-down on the List Details page.
with at least one item assigned to the list: View, Rename, Add Note, Make Private, Make Default, Sharing, Archive, Distribution Report, Distribution Report 3x5, Order, View Fund Effects, Download MARC Records, Download As CSV, and Delete. Other than View, these options are also available on the List Management Options drop-down on the List Details page.
The options for a list with a status of Released are: View, Add Note, Archive, Distribution Report, Distribution Report 3x5, Download MARC Records, and Download As CSV. Other than View, these options are also available on the List Management Options drop-down on the List Details page.
Note Column / Note Symbol: This column displays the Note symbol indicating a note has been added to the list using the Add Note drop-down option on the Lists Created By <User Name> page. Item notes are not reflected by this column. There is a Note column on the List Details page to indicate if a note has been added for an item.
Add New List: To create a new list, type the name of the list here and click the Add button. The new list is added to the Lists Created by <logged on User Name) display. See the Create a New List Help topic for detailed information.
Preferences: Click this button to open the My Database Preferences page. On this page you can customize the list of databases that will be displayed and available to be searched when you click the Search button. See the My Database Preferences Help topic for detailed information.
Searching: The Preferences button and the Look in, Find (as a), and Return fields allow you to establish settings that will help you to perform a successful search. See the Searching Help topic for detailed information.