Online Selection & Acquisitions
See also: Invoice Overview and Special Charges and Credits Management
This topic describes how to apply special charges and credits to an invoice. It is assumed that you have already created the invoice and are ready to add any special charges and credits to it.
To Access Invoice Management
Log in to OSA with a Username granted adequate permissions to work with invoices.
Click the Admin button and the Administration menu displays.
Click the Invoice link and the Invoice Management screen displays.

Note: The Invoice Number field is case sensitive. If alpha characters are in the Invoice Number you must type them exactly as the Invoice was originally created.
Type the Invoice Number you are working with, select the Vendor from the drop-down list and click the rotating red arrow button.
If a match is found, the Invoice will display.
To Add Special Charges and Credits
As appropriate, add any Special Charges to the Invoice as follows:
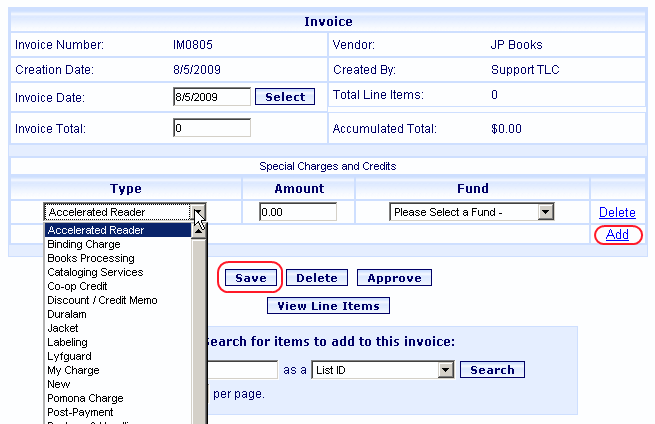
Click the Add link as shown circled in the example below.
Select the type of Special Charge from the drop-down list.
Type the amount of the charge.
From the Fund drop-down list, select the fund to be encumbered.
Note: If the Special Charge on the Invoice is not on the drop-down list of Special Charges, you can add a new type of Special Charge to the list.
Include additional Special Charges or Credits by repeating Steps 1-4.
When finished click the Save button. You will be advised the invoice has been saved.

For the next step in the Invoicing process, locating the list(s) containing the received items, see Search for Items to Add to the Invoice.
Return to: Special Charges and Credits Management