
Online Selection & Acquisitions
See also: Invoice Overview and Unapprove an Invoice
This topic describes how to add the items in the Search Results for Items to Add To Invoice Number nnnnn screen to the invoice. It is assumed that you have already created the invoice and added any applicable special charges and credits and located the lists with the items to be added. See Search for Items to Add to the Invoice if you have not already done so.
To invoice Non-OSA Expenditures see Invoicing Non-OSA Expenditures in OSA
When viewing a list of items, the underlined Invoice Number in the heading at the top can be clicked to return to the Invoice without taking action on the list items.
Click an underlined column heading to sort the display by that column information. Click the heading again to reverse the displayed sort.
To Access Invoice Management
Log in to OSA with a Username granted adequate permissions to work with invoices.
Click the Admin button and the Administration menu displays.
Click the Invoice link and the Invoice Management screen opens, as shown below.

Type the Invoice Number you are working with, select the Vendor from the drop-down list, and click the rotating red arrow button.
Note: The Invoice Number field is case sensitive. If alpha characters are in the Invoice Number you must type them exactly as the Invoice was originally created.
If a match is found the invoice displays, as shown below.
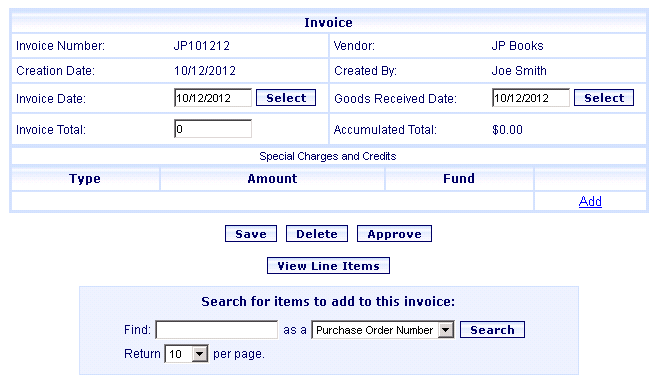
Before continuing you should have already located the items to add to the invoice. Continue to the next section below if you are already viewing the Search Results for Items to Add to Invoice Number nnnnn screen. See Search for Items to Add to the Invoice if you are not viewing that screen.
To Add the Received Items to the Invoice / Complete the Invoice (Approve)
If necessary, adjust the item prices.
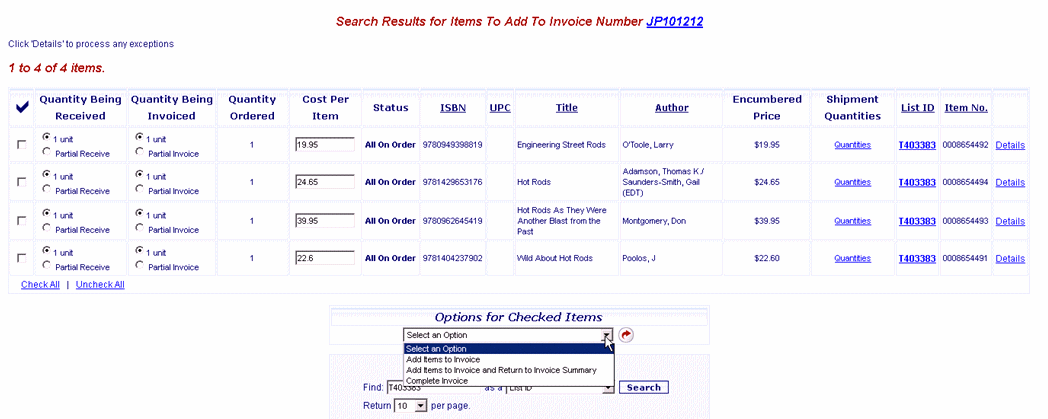
As shown in the example below, select the check box to the left of each item you want to add to the Invoice (Note the UnCheck All and Check All links at the bottom-left of the item list).
Partial Receipt of Items Ordered for a Title
Note: See the second example below for libraries with SEPARATE Invoicing and Receiving. Those users will not see the Quantity Being Received column.
If multiple copies of a title have been ordered the Quantity Being Invoiced column will provide options to select All X units or Partial Invoice. The Quantity Being Received column will provide options to select All X units or Partial Receive.
If multiple items for the title have been ordered but you did NOT receive ALL of the items, for the title in question, in the Quantity Being Received column select the Partial Receive option. An additional row will now display a text box allowing you to change the number of items received. For example Receive 3 of 3 can be changed to Receive 2 of 3. Change the entry as appropriate. In the Quantity Being Invoiced column, select the Partial Invoice option. Change the number in the Invoice X of X box as appropriate.
As viewed with COMBINED Invoicing and Receiving
As viewed with SEPARATE Invoicing and Receiving
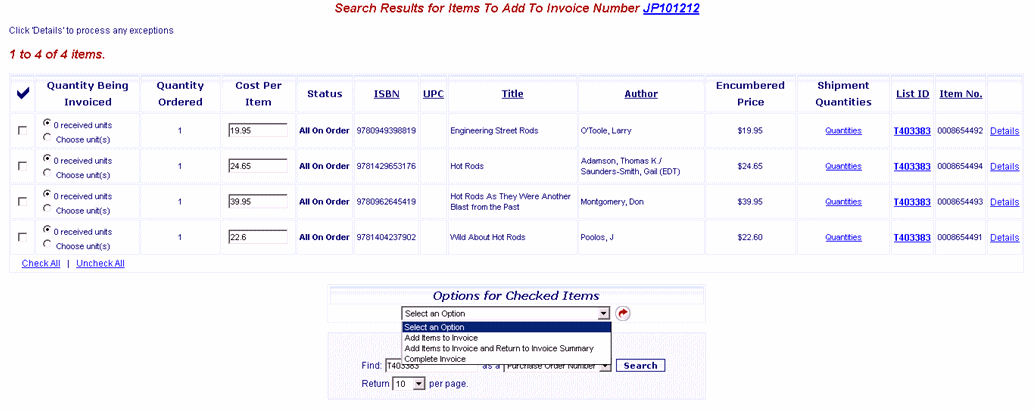
Under Options for Checked Items select the desired option from the drop-down list. Then click the rotating arrow button to the right.
The available options are:
Add Items to Invoice: When the user selects this option, the checked items will be added to the invoice.
If there are:
Items remaining on the list, those items will be displayed for the user to continue the receive process (now or at a later time).
NO remaining items on the list the Search Results for Items To Add To Invoice Number nnnnn will display. Click the underlined Invoice number to view the invoice, from which you can: Delete the invoice, Approve the invoice, View Line Items, or Search for items to add to this invoice.
When all the desired items for this invoice are received and added to the invoice, perform an Invoice Search and open this Invoice.
Click the Approve button. The Invoice Completion screen will display.
If there is a notice concerning problems with the totals click the View Line Items or the Invoice Details button and correct the problem before continuing.
If there is a notice advising Totals reconcile. This invoice appears to be complete; you should click the Approve button again.
The Invoice Approval screen will display advising, This invoice has been approved.
Continue as desired.
Add Items to Invoice & Return to Invoice Summary: When the user selects this option the checked items will be added to the Invoice.
You will be advised, The item(s) for this Invoice nnnn have been saved. Click OK.
The Invoice Summary Page will display with options to Save, Delete, Approve or View Line Items. Continue as desired.
When all the desired items for this invoice are received and added to the invoice, perform an Invoice Search and open this Invoice.
Click the Approve button. The Invoice Completion screen will display.
If there is a notice concerning problems with the totals click the View Line Items or the Invoice Details button and correct the problem before continuing.
If there is a notice advising, Totals reconcile. This invoice appears to be complete; you should click the Approve button again.
The Invoice Approval screen will display advising This invoice has been approved.
Continue as desired.
Complete Invoice: If you select this option the checked items will be added to the Invoice.
You will be advised, The line item(s) for invoice nnnnn have been saved. Click OK.
The Invoice Completion screen displays, as shown in the example below.
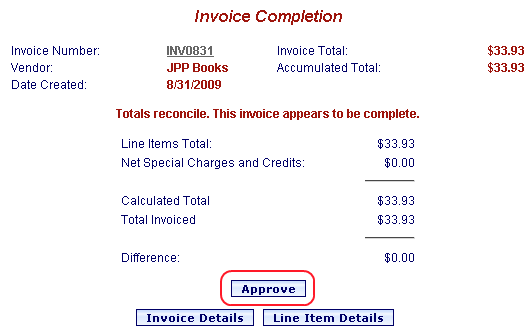
If the screen advises, Totals reconcile. This Invoice appears to be complete; click the Approve button.
Note: If there is a notice concerning problems with the totals, follow the on-screen instructions to correct the problem before continuing. See the If There Are Problems with the Invoice Totals section below.
The Invoice Approval screen displays advising, This invoice has been approved.

If There Are Problems with the Invoice Totals
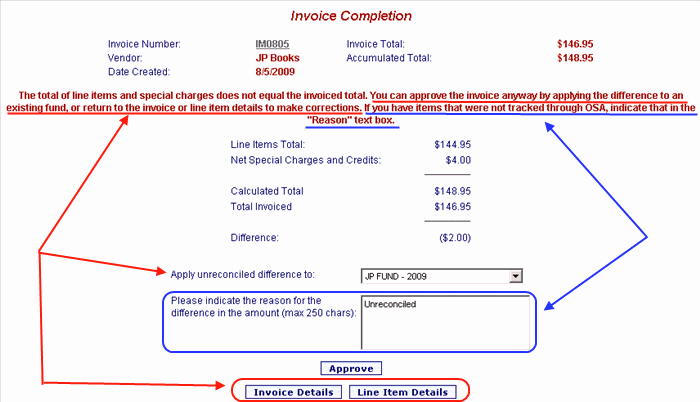
If there are problems with the invoice totals an Invoice Completion screen will display an error notice, as shown in the example at the bottom of this topic, noting the problem and advising the user that they can approve the invoice with the unreconciled difference, or make corrections to the Cost Per Item amounts or Invoice Total to correct the problem.
To continue with the unreconciled amount,
Select a fund from the Apply unreconciled difference to: <fund> drop-down and type a "reason" for the difference in the text box. A maximum of 250 characters can be entered. The information typed into the "reason" box will be displayed on the Fund History report.
Then click the Approve button. The Invoice Approval notice will open.
OR
Click the Invoice Details or Line Item Details buttons to return to the Invoice or Line Item Details to correct the problem(s).
If you return to the Invoice to make changes to the Invoice Total:
When finished with the invoice click the Approve button.
The Invoice Completion screen will open as shown in the INVOICE COMPLETION example above.
If the totals reconcile click the Approve button on the Invoice Completion screen and the Invoice Approval notice will open.
If you return to the Line Item Details to make changes to the Cost Per Item amounts:
When finished select Save Invoice from the drop-down list to the far-right below the last item on the list. Then click the rotating red arrow button. The invoice will be saved.
Click the underlined Invoice Number at the top-left to return to the invoice.
Click the Approve button. The Invoice Completion Screen will display as shown in the INVOICE COMPLETION example above.
It the totals reconcile, click the Approve button and the Invoice Approval notice will open.
Use the Invoice Search option under Invoicing on the Administration menu to view this invoice if you have closed the screen. When viewing the invoice details you can click the Unapprove button to open the invoice and make changes to it.
Invoice Completion with Unreconciled Amount Example
Return to: Search for Items to Add to an Invoice